

This article article contains a high-level guide for an example Virtual Private Server in the cloud running on Amazon's AWS Lightsail.
For all our guides, be aware that these are AIRIX.NET internal and are not suitable for absolute beginners.
The Virtual Private Server (VPS) we are going to install in the cloud is a Linux based server with Ubuntu. There are several cloud providers on the market and you can choose the one that fits best to your demands. This project builds on the Virtual Private Server by the AWS (Amazon Web Services) entry level offering called Amazon Lightsail.
Sign up with AWS for Amazon Lightsail
Firstly, you need to sign up with Amazon AWS Lightsail. The following link leads you away from AIRIX.NET and to their web site: https://aws.amazon.com/lightsail/.
From there you will find some additional information and marketing about the Lightsail offering and you will also find the link to sign up (at the time of drafting of this article, there was "Get started for free" button on their page).
Create the Instance in the Lightsail Console
When signed up successfully you will get access to the Amazon Lightsail Console to create and manage your instances.
Select Instances from the menu within the Amazon Lightsail Console
Click on Create instance.
Chose the data centre region
In a first step you can choose the region where you want to create your virtual private server in. Amazon provides data centers in the main global regions North America, Europe and the Asia Pacific region. Amazon suggests to select a region closest to your users:

Select the instance image & blueprint
The instance to be created will be based on a predefined image, called blueprint. Amazon Lightsail supports several Linux/Unix and Windows based instances. And you can choose between instances with pre-installed apps or instances with having only the operating system installed.
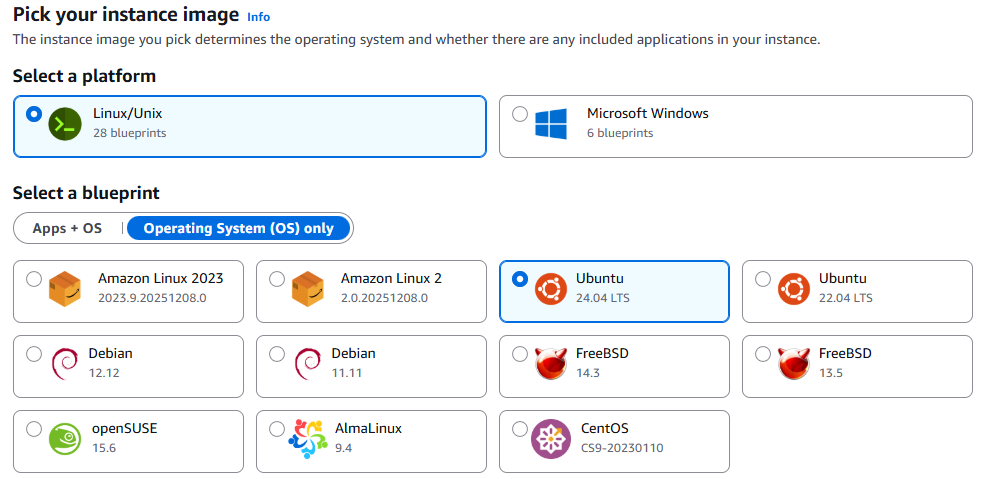
As we want to install Ubuntu Linux in the cloud, switch to Operating System (OS) only and select the latest Ubuntu LTS available in the list.
We skip the optional entries and do not add a launch script und leave the SSH key to Default.
Select the instance plan
Amazon provides multiple instance plans starting as low as US$ 3.50* for a small virtual server with 512MB RAM and 20GB SSD and IPv6 address only up to large instances for more than a US$ 1,000* per month.
* Net price, local applicable tax like VAT will be added when billed. Price examples mentioned are as of December 2025.
Select a network type
With option Select a network type you select whether an instance receives a public IPv4 and IPv6 address (dual stack), or an IPv6 address only. Selection of IPv6-only means that the instance won't get an external IPv4 address and can communicate over IPv6 only.
Although the subscription price of IPv6-only instances is a bit lower, we suggest to go for Dual-stack for most use cases. Therefore, select Dual-stack from the options.
Select a size
The Lightsail offering does now provide a significant number of options, starting with the smallest server with 512 MB memory, 2 vCPUs, 20 GB SSD storage and 1 TB data transfer. The options table below gives an overview of available sizes as of December 2025:
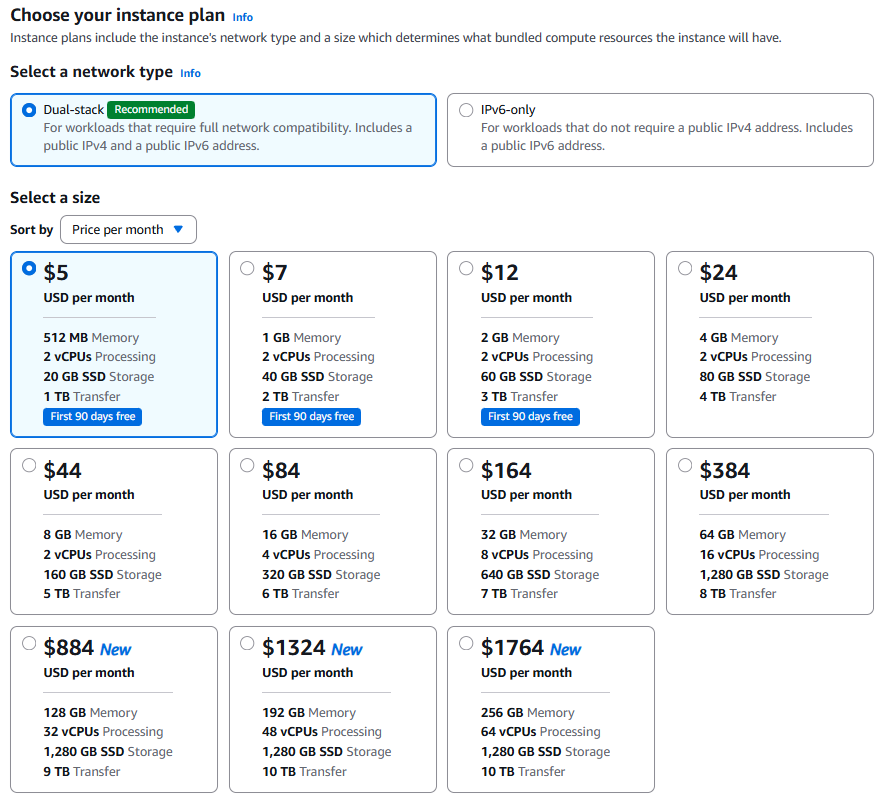
If you are unsure which size is most appropriate for your use cases, you can start with the smallest package. It comes with 2 virtual CPU, 512 MB RAM, 20 GB SSD storage and 1 TB Data transfer. With the data transfer allowance of 1 TB you can send and receive up to 1 TB of data to the internet within a month.
If it turns out that the selected package is too small for your needs, you can upgrade an existing instance to a larger instance. Note: A switch from a larger to a smaller package is not supported. You can create a new, smaller instance and set up from scratch, though.
Identify your instance
The next step is to provide a unique name for the new Lightsail instance. Optionally, you can also set tags for your instance to filter and organize your resources in the Lightsail console. Key-value tags can also be used to organize your billing, and to control access to your resources.

Instance Creation
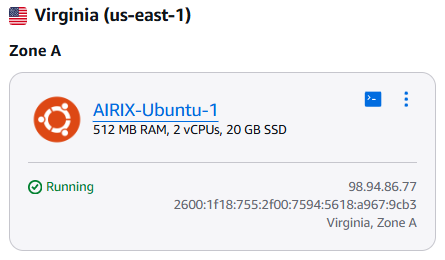
Hit the button Create instance and the instance will be created. This takes only a few minutes (it took around 1 minute when I tested it last) and the new instance is ready to use.
The instance has been created in the region you selected and has a dynamic IPv4 as well as IPv6 IP address (if you have selected the dual-stack option above).
Access your new instance
Once the instance has been created, it has a dynamic IP address assigned and it is ready to be used.
In the Lightsail console you can select the new instance, choose the tab Connect and use your browser to connect directly via SSH.
Connect to your instance with browser SSH

You can use your browser to directly access your instance via SSH within your browser. Click the button Connect using SSH.
Next Steps
Congratulations, now you have your new Virtual Private Server up and running in the Cloud with Amazon Lightsail.
There are a few more steps you should and may want to do.
At first, you may want to assign a static IPv4 address to your instance. Find more details here: Manage your Amazon Lightsail VPS: Networking and Static IP
Refer to this article to understand how to connect from SSH clients under windows to your Lightsail instance: Access to Your Amazon Lightsail Cloud Instance with PuTTY and WinSCP
Related topics
Manage your Amazon Lightsail VPS: Networking and Static IP
Manage your Amazon Lightsail VPS: Snapshots
Manage your Amazon Lightsail VPS: Stop, Start, Reboot, Delete Instances
