

Fail2Ban is an intrusion prevention framework that protects computer servers from brute-force attacks. It checks the log files for specific patterns and bans IP addresses temporarily.
As soon as your server is connected to the internet you can assume that it is under attack from somebody. Make sure that your firewall is configured and does not open anything which is not needed. Always ensure that your system is updated to its latest version.
As an additional measure, you can install Fail2Ban on your Linux server. It checks the log files for specific patterns and bans IP addresses temporarily.
Prerequisites
Fail2Ban is for servers running under Linux. We use it on our Ubuntu Linux server.
Have your server installed and running.
Install Fail2Ban
Login to the console of your Linux server and run the installation:
sudo apt update
sudo apt install fail2ban
The configuration files of Fail2Ban are in directory /etc/fail2ban/. As package updates may overwrite the original *.conf files, all changes should be done in a local version.
Hence, first copy jail.conf to jail.local:
sudo cp /etc/fail2ban/jail.conf /etc/fail2ban/jail.local
Make the changes in jail.local as needed using the nano editor:
sudo nano /etc/fail2ban/jail.local
Typical examples that you may want to adjust are:
bantime -> time in seconds an IP address gets banned (negative value means indefinetly banned)
findtime -> a host is banned if it has generated "maxretry" during the last "findtime" seconds.
maxretry -> "maxretry" is the number of failures before a host get banned
And then there are a number of pre-defined jails (e.g. [sshd]) that need to be enabled according to the individual configuration.
Set enabled=true to activate the respective jail.
Important hint: When you install new services on your server, always adjust the Fail2Ban settings accordingly!
Once you have done the changes in jail.local, do a configuration test:
sudo fail2ban-server -t
If okay, then restart fail2ban:
sudo systemctl restart fail2ban
Logs & Status
The log is available under /var/log/fail2ban.log

The command fail2ban-client supports in getting a status. See what jails are active:
sudo fail2ban-client status
Currently only 1 jail is active, the one for sshd that we had just activated.
To see what IP addresses are currently banned:
sudo fail2ban-client status sshd
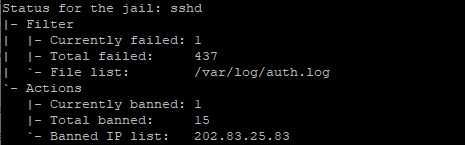
Here in the example above, currently one IP address is banned.
Note: When you install new services on your server, always adjust the Fail2Ban settings accordingly!
Next steps
Now Fail2Ban is actively running on your system but it only monitors the activated "jails". Next step is to configure Fail2Ban for your system: Configure & Monitor Fail2Ban
