

Fail2Ban is an intrusion prevention framework to fight against brute force attacks. This article describes how to configure and monitor your Fail2Ban settings.
As soon as services are made available through the internet (like installing additional software on the cloud server and have the respective ports open in the firewall), the service will be attacked by someone from the internet. As one means for intrusion prevention, I use Fail2Ban on the cloud server.
Fail2Ban checks the system's log files for specific patterns and bans IP addresses temporarily. This does only work properly, if the Fail2Ban framework is configured for your individual system. Keep in mind, whenever you install new services on your server (e.g. webserver, e-mail, etc.), always adjust the Fail2Ban settings accordingly.
Prerequisites
This article describes how to configure and monitor Fail2Ban. As a prerequisite you need to have installed Fail2Ban on your system. Refer to this article if you want to learn how: Intrusion prevention with Fail2Ban.
Fail2Ban Logs
The Fail2Ban log is available in directory /var/log/ in the file /var/log/fail2ban.log. Previous logs are also stored in this directory.
To view and scroll through the file, you may use tools such as less
less /var/log/fail2ban.log
or other tools to view log files as described in article Manage & Monitor Log Files in Linux.
Example of a fail2bain.log file:

Fail2Ban Jail Status
See what jails are active:
sudo fail2ban-client status
In this example only 1 jail is active, the one for sshd.
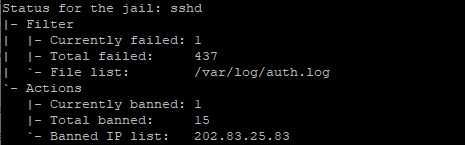
To see what IP addresses are currently banned:
sudo fail2ban-client status sshd
Fail2Ban Configuration
The Fail2Ban configuration file directory is: /etc/fail2ban. As per installation of Fail2Ban (see: Intrusion prevention with Fail2Ban) we use the local copy of /etc/fail2ban/jail.local to configure Fail2Ban.
Jails for Services and Applications
The configuration file jail.local does already include many pre-defined configuration entries for services and applications, but these are disabled by default.
There is a global entry for all jails but this should be set to enabled=false and it is recommended that it stays this way. Enable only relevant to your setup jails in your .local or jail.d/*.conf.

Further down in the config file there is an area with all the defined "jails":

In the example above, only the jail for SSHD has been enabled, because it contains the entry enabled=true.
The jail for DROPBEAR is prepared but as it has not an enabled=true entry, it stays disabled. To enabled a jail add the line enabled=true or change the value from false to true in case the entry does already exist.
The change can be done with the editor nano:
sudo nano /etc/fail2ban/jail.local
Once the change has been done in jail.local, save the file (Ctrl-O), exit nano (Ctrl-X) and do a configuration test:
sudo fail2ban-server -t
And, if okay, restart:
sudo systemctl restart fail2ban
Check the Fail2Ban status afterwards (for details, see section above).
Jail: Apache HTTP
sudo nano /etc/fail2ban/jail.local
Further down in the "jail area" the configuration for Apache HTTP contains quite a number of pre-defined different jails for Apache (currently nine different entries):
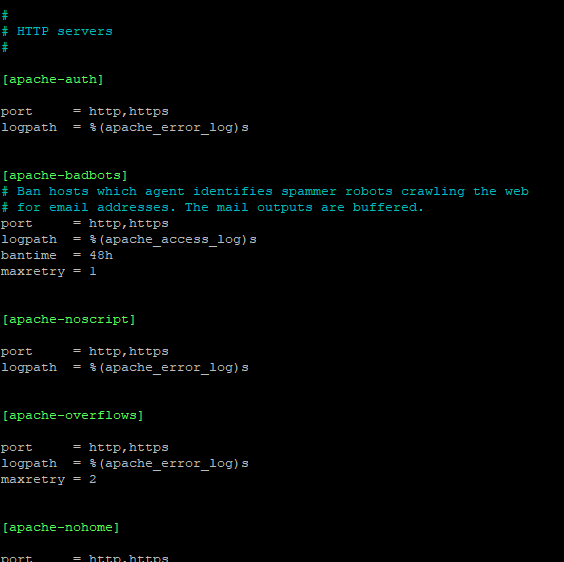
We will activate all of them by adding the line enabled=true, save the file, exit nano and run the configuration test:
sudo fail2ban-server -t
And, if okay, restart Fail2Ban:
sudo systemctl restart fail2ban
Check the Fail2Ban status afterwards:
sudo fail2ban-client status
It shows now all activated Apache jails:

Conclusion
Now you know how to monitor and configure your Fail2Ban framework on your server. Make sure that you always adjust the settings when you installed new software or activated services.
