
This article explains how to set up a classic router cascade with a DD-WRT router together with a router of your internet service provider (ISP).
To connect your DD-WRT router (for more details about DD-WRT, its hardware, and flashing with DD-WRT, refer to our article Boost Your Router with DD-WRT) to your broadband, you need a modem that is compatible with your specific broadband connection such as DSL or cable. In many cases you get a router with an integrated modem from your ISP, e.g. Speedport from Deutsche Telekom or a Hub from Virgin Media. But these routers your ISP provides are normally their specific routers and they are not capable to be flashed with DD-WRT alternative router software.
The best option to use the modem functionality of your ISP provided router is to change its setup to modem mode and then link it to your DD-WRT router. An example for Virgin Media Hub 3.0 is described in the article Virgin Media Broadband with DD-WRT Router.
This is clearly the preferred option for most use cases, but you loose additional functionality, such as Telephony, your ISP's router provides. In cases where you need to rely on the additional functionality an alternative is to build a router cascade with the ISP provided router as the first router and DD-WRT as a second router. Be aware that this means you are creating a so-called double NAT which may lead to issues. But in many cases it will work fine and you might not even notice it. For most people, a double Network Address Translation (NAT) configuration doesn't create a noticeable effect on network performance either.
You can find more details about NAT and double NAT in article Double NAT and is it really bad?
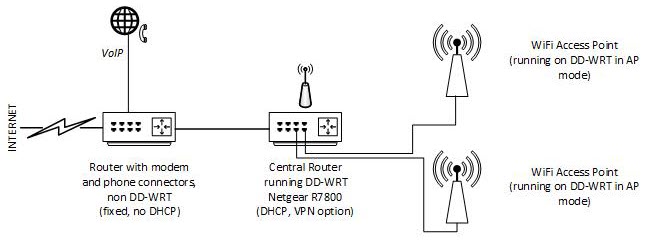
In our setup we will define our network as follows:
Be aware that with double NAT devices belonging to one NAT will not communicate locally with those of the other NAT because each router has its own private set of local IP addresses shielded from the outside.
As you can see from the picture above, we use the first router (on the left) for connection to the internet (it has an integrated modem) and for VoIP Telephony. The second router (on the right) "Central Router" is our main router which runs the DD-WRT alternative router firmware. All devices, such as computers, iPhones, iPads, etc. will be linked to the second router only. The only connections the first router has is the link to our Central Router and to the VoIP telephony devices.
Technically you connect both routers by ethernet cable on their LAN ports (not the WAN port on DD-WRT).
Setup ISP provided Router Modem for Router Cascade
We set up the router as follows:
- Switch off all WiFi; WiFi will only be provided by our central router and its additional WiFi access points
- Select an IPv4 address range separate from the IPv4 address that we are going to use in the Central Router. Let's take 192.168.2.1 for example.
- If possible switch off DHCP and assign static IP address to the Central Router or configure that the Central Router will always get the same IP address, e.g. 192.168.2.111 (see the example for Speedport on the screenshot below).

Setup DD-WRT Router as Central Router in Router Cascade
The setup of the Central Router in DD-WRT is as follows:
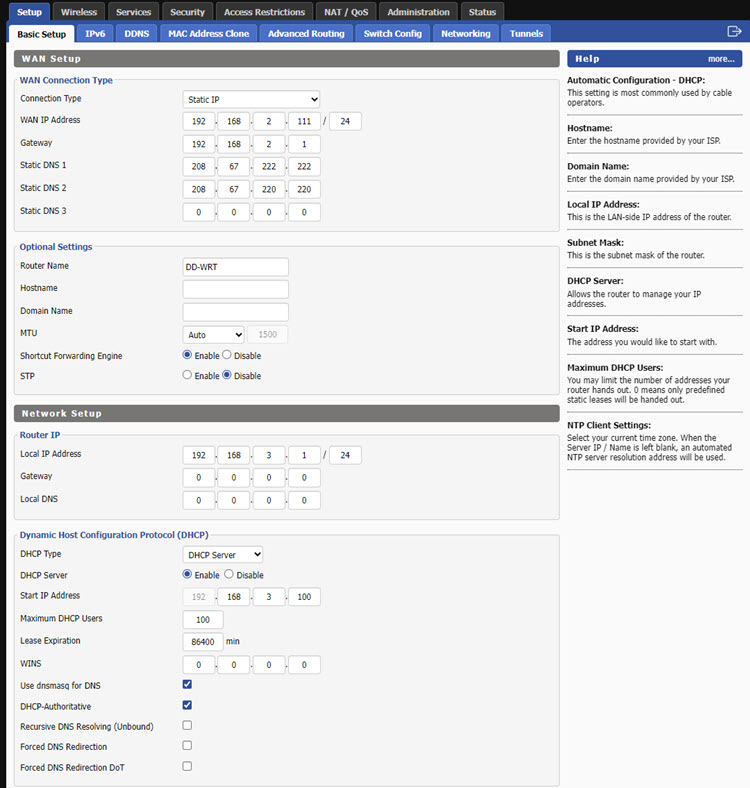
- WAN Connection Type - Connection Type: Select Static IP
- WAN Connection Type - WAN IP Address: Enter the Central Routers IP address it has on the first router (as assigned above under no. 3), in our example 192.168.2.111
- WAN Connection Type - Static DNS 1 / Static DNS 2 / Static DNS 3: Enter the IP addresses of the DNS server you want to use
- Router IP - Local IP Address: Enter the Central Router's IP address of its own network, e.g. 192.168.3.1/24 (Important: It needs to be separate from the IP address assigned under no. 2 and it needs to be separate from the IP address range the first router uses)
- Dynamic Host Configuration Protocol (DHCP) - DHCP Type: We will use our Central Router as DHCP server, therefore we select DHCP Server
- Dynamic Host Configuration Protocol (DHCP) - DHCP Server: Select Enable
- Dynamic Host Configuration Protocol (DHCP) - Start IP Address range: Enter the range from the same segment that we entered under no. 4, e.g. 192.168.3.100
- Dynamic Host Configuration Protocol (DHCP) - Use dnsmasq for DNS: Check the box
- Dynamic Host Configuration Protocol (DHCP) - DHCP-Authoritative: Check the box
That's the main configuration for the router cascade. Apply settings and test that everything is working as expected.
You should be able to access the Central Router with its IP address assigned in step 4, e.g. 192.168.3.1 and the first router under its assigned IP address, e.g. 192.168.2.1.
Port-Forwarding in Router Cascade
In cases where you use port-forwarding you need to set up the forwarding entry twice, at the first-level NAT (first router) map the forwarded port to the IP of the router on the upper (second router) NAT:
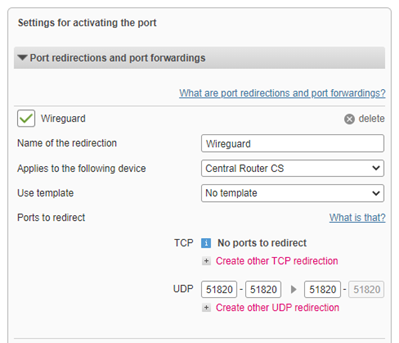
The screenshot above shows an example for port-forwarding on a Telekom Speedport Smart router for Wireguard VPN. The forward is for UDP port 51820 and to the Central Router as destination (see selection in field Applies to the following device).
But that is not enough because you are running your network with double NAT. At the top-level NAT (our Central router), map the forwarded port to the IP address of the destination device:

The destination device running the Wireguard VPN server is 192.168.3.11 for UDP port 51820.
To forget either of the forwarding rules is probably the most common mistake administrators make in double NAT networks.
Dynamic DNS in Router Cascade
When you are connecting your router to the internet you will get in many cases a random dynamic IP address that may change any time. To bypass this restriction, Dynamic DNS links your current IP address to a stable domain name. Many routers provide the option to trigger updates of the Dynamic DNS automatically whenever the external global IP address changes. For background information please refer to article Dynamic IP addresses and how you can connect to your home from outside.
In a router cascade only the first router is directly connected to the internet, whereas the second router, in our example the Central Router, does only know its internal IP address it has with the first router (as per example above this would be 192.168.2.111). The Central Router does not know if and when the external global IP address changes. In consequence, the Dynamic DNS update needs to be triggered from and run on the first router in the cascade.
Related Articles
Dynamic IP addresses and how you can connect to your home from outside
Dynamic DNS with Telekom Speedport Smart Routers