

When you subscribe for Broadband from Virgin Media they provide you with one of their routers, either Hub 3, Hub 4, or Hub 5. Neither of these is capable to run the alternative router firmware DD-WRT, but you can still link your DD-WRT router to your Virgin Media Broadband. This article explains how.
DD-WRT does only run on very specific hardware (for more details about DD-WRT, its hardware, and flashing with DD-WRT, refer to our article Boost Your Router with DD-WRT.
To run your own DD-WRT router with Virgin Media broadband, you can use the Virgin Hub in modem mode or while the Virgin Hub is still in router mode you link up your DD-WRT router as a second router.
DD-WRT Router link to Virgin Hub 3.0 in Modem Mode
This is the preferred approach you should use in most cases. You switch the Virgin Media Hub to modem mode and all router related activities will be handled by your DD-WRT router. In modem mode, the Virgin Hub does not provide any additional router functionality it normally has. Of course, you can switch it back to router mode if you would prefer to use the Virgin Hub as your primary router.
Before you start have your DD-WRT router ready and flashed with the latest DD-WRT version you want to use. If you are new to Virgin Media make your first connection to the broadband network in router mode and make sure that your connection and the Hub is running well.
To switch the Hub to router mode:
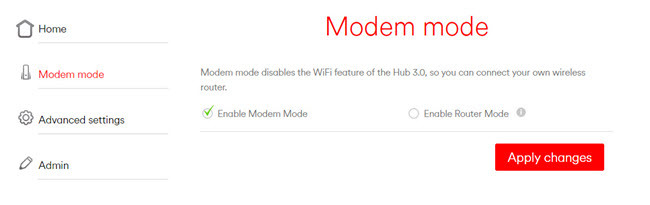
- Log in to your Hub's settings page by entering the address 192.168.0.1 into the address bar of your browser
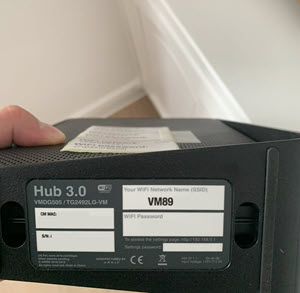
- Enter your Hub 3 setting password. The default password is printed on the bottom of the Hub 3.0. If you have changed the default password, enter that password instead.
- After you have logged in, click Modem Mode on the left menu area
- Click the option Enable Modem Mode and then click Apply changes button
The Hub has now been switched from Router Mode to Modem Mode.
With that, the IP address of the Hub's settings page changes from 192.168.0.1 to 192.168.100.1 !
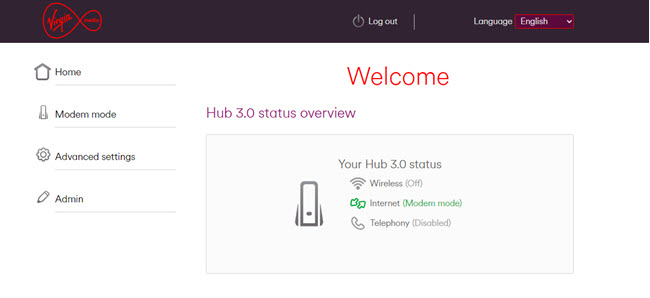
From now on (until you would switch it back in to router mode) your Hub is a modem only, WiFi, Routing, Telephony, etc. is not active anymore. The Routing and WiFi functionality will be provided by your DD-WRT router.
Switch the Hub off now and leave it off for a minute or so.
Meanwhile get your readily installed DD-WRT router and make sure that it is properly configured:
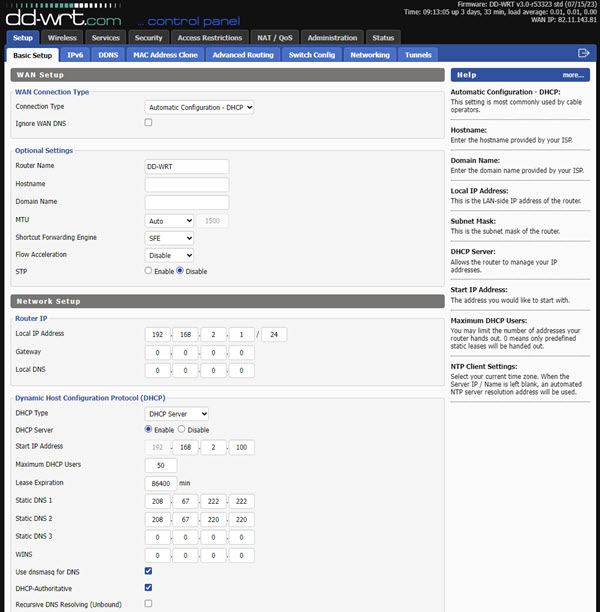
- Set WAN Connection Type - Connection Type to Automatic Configuration - DHCP
- Set Router IP - Local IP Address to a suitable value outside the range of your Hub's IP address 192.168.100.1, e.g. 192.168.2.1/24
- For DHCP select DHCP Type Type DHCP Server, enable DHCP server and enter Start IP Address to you suitable range as per above router's IP, e.g. 192.168.2.100
- Enter appropriate DNS Server IP addressed into fields Static DNS 1, Static DNS 2, Static DNS 3.
Configure all other settings as needed, e.g. for WiFi etc.
Switch off your DD-WRT router and connect it to the Hub by ethernet cable. On the Hub you can connect the cable to port 1 and on the DD-WRT side the cable goes into the WAN port (often marked with a blue label).
Switch on the Hub, wait 1 minute and switch on the DD-WRT router.
Now your DD-WRT router is the main router in your setup while the Hub in modem mode is providing the connection into the Virgin Media broadband network.
You get access to your router via the IP address entered under no. 2 above and access to the Virgin Media Hub by its IP address 192.169.100.1.
DD-WRT Router link to Virgin Hub 3.0 in Router Mode
The other option would be to leave the Hub in router mode and add the DD-WRT as a second router behind the Hub router (router cascade). The advantage would be that Telephony on the Hub is still available but you are then having a "double NAT". What that means and its potential disadvantages are explained in article Double NAT and is it really bad?.
How to set up a router cascade, refer to article Configure a Router Cascade with a DD-WRT Router and be aware of Double NAT.
Putting the Hub 3.0 back into router mode
If you want to use the Hub as a router instead of your DD-WRT, you can switch it back from modem mode into router mode.
Use Hub settings to switch the Hub from modem mode to router mode
Enter 192.168.100.1 into the address bar of your browser
Enter your Hub 3.0 settings password. The default password is printed on the bottom of the Hub 3.0. If you have changed the default password, enter that password instead
- Click Modem Mode on the left
- Select the option Enable Router Mode and then click Apply changes
The Hub will reboot and return to router mode
Use pin hole reset to set the Hub to factory defaults
You can reset the Hub 3.0 to factory settings which will restart the Hub 3.0 in router mode.
Note: This will reset all settings you have made to its factory defaults!
Using a paper clip or a pen, press the pinhole marked ‘RESET’ on the back of your Hub for 20 seconds. This will restore the Hub to its default settings, which you’ll find on a pull-out tab on the bottom.
Then, switch off the Hub for a minute before turning it on again.
