

DD-WRT is an alternative router firmware that offers many advanced features not found in the original firmware of the devices. Read here what's all the fuss about.
The alternative router firmware DD-WRT offers many advanced features not found in the original firmware of routers. In many cases, manufacturers limit the potential of their routers in the original firmware to make the user interface easier and less error prone or to make more advanced features only available in high end routers. DD-WRT replaces the original router firmware and unlocks additional features a router can technically support.
But it is not as easy as it may read here and full of risks and you may even destroy your router. When searching the web you will find lots of wrong or outdated information when it comes to DD-WRT. With this article you get some basic understanding about DD-WRT and how you potentially may boost your router by flashing it with DD-WRT.
What is DD-WRT?
DD-WRT is a Linux based alternative router firmware for routers and access points. It is designed to replace the original firmware of a router to provide additional features and functionality, normally only available in professional and more expensive routers. The DD-WRT is provided as open source software and freely available for downloads. The founder and primary maintainer of the DD-WRT project is Sebastian Gottschall, known as "BrainSlayer".
DD-WRT is not the only alternative router software available. But DD-WRT is available for many years now, the community around DD-WRT is well established, and the firmware is actively maintained and updated (I have counted around 92 builds published in 2020).
DD-WRT is pretty much complete, which means you don't have to install many single bits and pieces and you get a web interface to configure DD-WRT.
DD-WRT supports many different router models, both new and outdated, but it is not very easy to get an overview what is available and what is working.
Various websites, and even the official web site https://dd-wrt.com/, provide sometimes outdated or contradicting information. And, when you update your router with the alternative DD-WRT firmware, you normally will loose any manufacturer's warranty and you have a risk to "brick" your router. To "brick" a router means that due to a faulty firmware updating process, the router cannot be used or restored (see: https://en.wikipedia.org/wiki/Brick_(electronics)).
I understand that bricking a router is an existing risk, but so far it luckily never happened to me.
Can I boost my AVM Fritz! Box or Speedport Router with DD-WRT?
DD-WRT is available for wireless routers based on a Broadcom, Ralink, or Atheros chip reference design. DD-WRT is not available for AVM Fritz! Box or Speedport.
In most cases, a DD-WRT router cannot even fully replace a Fritz Box or a Speedport router, because Fritz Box and Speedport normally also provide an internal modem (DSL, cable, fibre) to connect to broadband or cable and they may have telephone ports to connect analogue or ISDN phones, too. I am not aware of any DD-WRT router that provides an internal modem and telephone connectors.
In many cases, I assume, the DD-WRT routers run behind routers such as Fritz Box and Speedport or are connected to DSL or cable modems.
Which Features are Available with DD-WRT?
The features available with DD-WRT depend on the router model. DD-WRT cannot provide additional functionality if not technically supported by the router model.
Typically you will get, besides others, the following features with DD-WRT:
- Access Point Mode (use the DD-WRT router to provide a wireless access point)
- Multiple SSID support (provide several wireless networks with separate SSID)
- Access Restrictions (restrict access on the basis of time, protocol, or destination)
- Dynamic DNS support
- VLAN (A VLAN is, in basic terms, a group of physical interfaces on a switch that behave as if they are a separate standalone switch)
- Mesh Network support
- WDS Repeater Mode
- Hotspot Portal Support
- Client Isolation Mode (a mode that can be used for Hotspots to limits clients to communicate only with the Access Point and not with other wireless clients)
- VPN Client Support
- VPN Server Support
- Bandwidth Management / QoS / Quality of Service (manage bandwidth relationship between individual applications or protocols)
- Samba support (provide files and printers over the network)
- DMZ (Demilitarized Zone) support
- Cron support (a type of scheduler for Unix/Linux that runs given commands at designated times)
Is the DD-WRT firmware stable and reliable?
The DD-WRT firmware is frequently updated and new builds are made available typically multiple times in a month. But there is never a fully tested, stable, or reliable release. Each build provided is a "beta"-release and the community never updates "stable" release. In case you find a "stable" release somewhere on the internet, even if it is on the DD-WRT website, you can assume that it is exceedingly outdated and you should not use.
That means to find if a DD-WRT is working, you can only check other user's experience with the latest or previous builds, shared on the DD-WRT forums, and to test it yourself. But you can assume that each build contains bugs. The question is more, are you impacted by the bug or not as you may not use the specific functionality.
If this sounds bewildering or cumbersome to you, then DD-WRT may not be the right firmware for you and you can stop reading here.
What routers are supported by DD-WRT?
Obviously, not all routers available on the market can be flashed with DD-WRT firmware. But with roughly more than 400 different firmware builds per release, the list of supported routers is quite comprehensive.
There is a "router database" available on the DD-WRT website, but this is not maintained and outdated. Hence, do not use the router database!
The Supported Devices List (https://forum.dd-wrt.com/wiki/index.php/Supported_Devices) does not show up to date information either.
The current best practice is to go to the latest available beta build for your router, here: DD-WRT » Other Downloads
There you find the builds in folders by year with subfolders per build, named by its build date. Hence it is quite easy to find the very latest version. Then you can scroll through the directory with the latest builds and see the directory for each supported router:
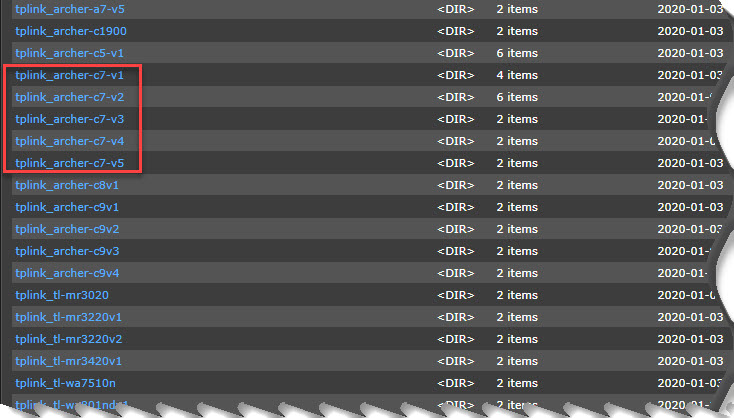
As you can see on the screenshot above, there may be different builds available for the same router type.
For example, the TP-Link Archer C7 has separate builds as per hardware revision. Although TP-Link Archer C7 is generally supported, a TP-Link Archer C7 with hardware revision C6 - once it will become available - may not be supported.
In the router directory (make sure it's the right router including hardware revision version, if applicable) you may find different firmware types:
![]()
The TP-Link Archer C7, for example, comes with two files:
- factory-to-ddwrt.bin -> to be used, when flashing a router which is currently on original TP-Link firmware
- tplink_archer-c7-v5.bin -> to be used, when upgrading a router which has been already flashed with DD-WRT before
Other routers (e.g. my Asus routers) may only have one file to be used in both scenarios.
And beware: Flashing a router with the wrong firmware will highly likely brick the router.
Searching through this list will help you to identify if a DD-WRT build is available for the type of router you have.
Then, got the forums DD-WRT :: Index and read about specific beta builds and see how they work for a particular piece of router hardware. Do a search for your specific hardware in the forum search or use a search engine and use "DD-WRT" in quotes with the word AND (in uppercase) plus your hardware or issue to perform your search.
When you do not see any show stoppers in the forums you can start with this build available for your specific router and check how far you get. Once you have flashed your router, you will see if you are impacted by any of the potential bugs. In case any bugs impacts you, you can wait for a new release and see if the big has been fixed, or you walk backwards build by build until you find a build that does not contain this specific bug (but you may come across other bugs, then).
In case you want to buy a new router, starting from the file list of available builds an choose any you want is not the recommended approach, as some routers are better to work with DD-WRT than others. Even if a build for a router is listed, it does not necessarily imply that the installation process is simple and/or that it works without limitations or failures.
Which router or access point should I buy?
As with many DD-WRT related questions, this is not easy to an answer. Although in general Broadcom based devices are supported, it is recommended to stay away from Broadcom.
A good starting point is to look at the FAQ list on the DD-WRT forum (as long as the update is quite recent): DD-WRT Which router should I buy?
As of April 2024:
- Netgear XR700 (or it's predecessor Netgear R9000) are the most powerful, but also most expensive, routers from the list.
- Netgear XR500 (or it's predecessor Netgear R7800) are also high end routers and recommended for high performance use cases such as VPN.
- Fairly cheap is the TP-Link Archer C7 (v2-v5) but it is not ideal for a speedy VPN.
The problem with this is that the routers are not the latest routers available on the market and they may be hard to get. That's one of the worst issues with DD-WRT that it is typically not available for new and current hardware. Reason is that the DD-WRT relies on donations of router hardware and latest routers are rarely donated by users.
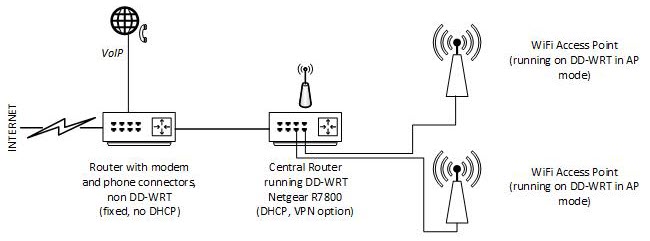
The current setup I am using is Netgear R7800 as my main router (connected as a router cascade behind a Speedport) and two additional TP-Link Archer C7 in access point mode for the required WiFi coverage.
In addition to this, I have been using and flashed successfully:
- Buffalo WZR-HP-G300NH2
- Asus RT-AC68U
- Asus RT-AC87U
But from this list, the Buffalo is very old and the two Asus models are Broadcom based, hence not recommended anymore.
Before buying a new router, also browse through the DD-WRT forums and check for recommendations and experience others made.
Flashing the router
Once you found the proper build for your router and you are ready to loose the warranty and to potentially brick the router, you may be ready to go. As a fallback I always make sure that I have a secondary router or internet connection available while experimenting with the router firmware, to avoid of becoming stranded.
Before starting the flashing of your router, you should again search the forums for an installation guide for your specific router. If it's available, then follow it step by step and avoid shortcuts.
For the Netgear XR500 and R7800 there is a guide available here on the DD-WRT forum (you need to register and login otherwise you won't see the attachment link with the install guide): https://forum.dd-wrt.com/phpBB2/viewtopic.php?t=320614
Unfortunately, where to find additional information about flashing the router is not consistent. For TP-Link Archer C7 I found additional information here TP Link Archer C7 - DD-WRT Wiki but still recommend to check and search the forum, too.
If flashed successfully you will be able to access the DD-WRT web interface at IP address 192.168.1.1 and you will be asked to assign a user name and password for the router administrator. Then you can start to configure as needed.
