
In this overview we'll show how to attach external mass storage, such as a USB hard drive, to your Raspberry Pi.
Mass Storage
For the Raspberry Pi it is crucial to have a reliable mass storage device with low power consumption. The Raspberry Pi 4 does not have any SATA interface but comes with an interface chip supporting two on-board USB 3.0 connectors. The USB is technically speaking a USB 3.2 Gen 1 connector where the Raspberry Pi is capable to handle a data rate of around 300 MByte/second.
If mass storage capacity is key, you may want to go for a 2.5" magnetic hard drive which are currently available with up to 5TB capacity. These hard drives may consume around 4W when in use. Connecting two of them directly would go beyond the power a Raspberry Pi provides at its USB port.
The use of external 3.5" hard disks with external power supply is not recommended, as some of them have a comparatively high continuous power consumption of 10W or more.
Considering that SSDs drive are normally much more expensive and you cannot get speed advantage with a Raspberry Pi, one external USB 3.0 magnetic hard drive wit up to 5TB may be a good option.
File System
The majority of modern Linux distributions, including Ubuntu, defaults to the ext4 filesystem. And this is normally a good option to go for with your external mass storage.
If you prefer to have the option to directly plug in your external hard drive into a Windows Computer from time to time, the file system to choose is NTFS as this is compatible with Microsoft Windows.
The best option to go for is ext4 and that's our current recommendation. Only in case where you want to plug in the same hard disk directly into a Windows computer, NTFS would be the file system to choose.
Link and identify the hard drive
Fot the next setup steps, plug the external USB hard drive into the Raspberry Pi 4.
The Linux command to list all bulk storage devices is lsblk. Drives get names sda, sdb, sdc and so on.

Create the partitions
To create one or more partitions on your hard drive (this is not always necessary if the disk is already partitioned to your needs) use the fdisk tool together with the applicable name of the disk (as you can see from the screenshot above the disk name is sda and it does already have the partition sda1):
sudo fdisk /dev/sda
The fdisk utility will then guide you by command line through different steps to show the existing partitions and to add / create partitions.
Once you have specified the partition details, you to write it to the disk using the w command.
Important: Be very careful when partitioning a disk as you may loose data already stored on the disk!
Create a File System on an Ubuntu Disk Partition
The general syntax for formatting disk partitions in Linux is:
mkfs [options] [-t type fs-options] device [size]Format with file system ext4
As explained before ext4 is the standard file system you may go pick for most use cases.
Format a disk partition with the ext4 file system using the following command:
sudo mkfs -t ext4 /dev/sda1To display a list containing file system information, you can use lsblk with -f option:
lsblk -f Format with file system ntfs
The recommended standard option for a file system is ext4. If you need compatibility with Windows systems because you want to plug your hard drive directly into a Windows computer, NTFS is the option to take. NTFS is supported by Windows and by Linux.
Run the mkfs command and specify the NTFS file system to format a partition:
sudo mkfs -t ntfs /dev/sda1To display a list containing file system information, you can use lsblk with -f option:
lsblk -f
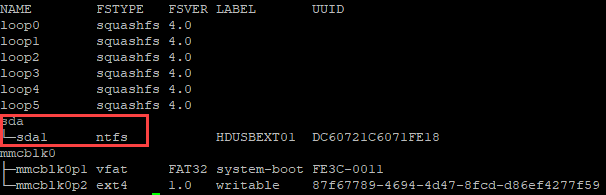
As you can see at the screenshot partition sda1 has now been formatted with file system NTFS.
Mount the Hard Drive
In Linux, storage devices need to be mounted to the system before they are available.
Create a mount-point
Before you can mount a device, a so-called mount-point needs to be created. In principal this is just an empty folder that can be stored in any path. Typical paths to store the mount-point are /mnt or /media.
The name of the mount-point should be descriptive to make identification easier.
In our example we create the mount-point /mnt/share:
sudo mkdir /mnt/share
Manual mount
Now that the disk is formatted with the file system of your choice and the mount-point created it can be mounted manually:
sudo mount -t auto /dev/sda1 /mnt/share
where /dev/sda1 identifies the partition and /mnt/share the moint-point created before.
Once the device has been mounted, you can check the mount-point with lsblk -f or blkid -o list :

Static mount
The manual mount is active as long as you do not unmount or until the next system restart.
An entry in file /etc/fstab can be made to mount disks at system boot time.
So far we addressed the drive by sda or the partition by sda1. But because this is an USB hard drive the name can changed when other USB devices would be connected to your Raspberry Pi, we will use the UUID (Universally Unique Identifier) to identify the drive.
The command blkid -o list lists the devices including their UUID:
To permanently mount the drive at system boot time, we edit the fstab file:
sudo nano /etc/fstab
On a newly created Ubuntu system running on a Raspberry Pi the initial /etc/fstab may look like this:

Add at the very bottom a new line for the hard drive:

The order of records in fstab is important because during boot the system sequentially iterates through fstab and mount in the order defined.
Blank lines and comment lines beginning with a "#" are ignored.
The space or tab-separated fields within each row must appear in a specific order:
device-spec – The UUID, device name, label, or other means of specifying the partition or data source this entry refers to.
mount-point – Where the contents of the device may be accessed after mounting.
fs-type – The type of file system to be mounted, e.g. ntfs or ext4.
options – Options describing various other aspects of the file system, such as whether it is automatically mounted at boot, which users may mount or access it, whether it may be written to or only read from, its size, and so forth; the special option defaults refers to a pre-determined set of options depending on the file system type.
dump – A number indicating whether and how often the file system should be backed up by the dump program; a zero indicates the file system will never be automatically backed up.
pass – A number indicating the order in which the fsck program will check the devices for errors at boot time:
      0 - do not check
      1 - check immediately during boot
      2 - check after boot
In the example screenshot above we use the UUID to identify the device, mount it to /share use default option, set dump to 0 and pass to 0.
After you have maintained your entry properly, save the file and then reboot the Raspberry Pi:
sudo reboot
Once the system is back and running again after the reboot, check if the hard drive is linked and mounted correctly:
blkid -o list
Unplug your USB drive: Unmount with umount
During shutdown or reboot of a system the storage devices will be unmounted automatically by the system. Always use the proper commands like sudo shutdown or sudo reboot and never pull the power cable while the Raspberry Pi is still running.
In case you want to unplug your USB hard drive from the Raspberry Pi while it is still active, you need to unmount the storage device first. Use
sudo umount /mnt/share
- where /mnt/share is your active mount point - before pulling out the USB cable (or shutdown the system first).
Best practices
To reboot the system: sudo reboot
To shutdown the system: sudo shutdown
To unmount a storage device: sudo umount [mountpoint]
Don't pull the Raspberry Pi's power cable before shutdown!
Don't pull the USB cable when a drive is still mounted!
If you have a power-cut you can try to repair the file system with:
sudo umount /mnt/share

sudo fsck /dev/sda1
and replace the mount-point /mnt/share and the partition /dev/sda1 to what's applicable to your system.