
To connect into your home network when on the road or to use a secure internet connection from an potentially non-secure connection, such as an open Wifi, you can run your own VPN on a home server. This article explains how to install a WireGuard VPN server on your home server.
The abbreviation VPN stands for Virtual Private Network which means an encrypted connection over the internet from a device to a network. When browsing through the internet you probably come across thousands of adverts or spam where VPN providers promise secure connections.
Why we don't trust commercial VPN providers is covered in our article The Myth about Commercial VPN.
To connect from outside into your home network, the only trusted option for us is to run your own VPN server on your home server. Once your are connected and "tunneled" into your business or home network you have access to its local network resources, while the local resources don’t have to be exposed directly to the Internet.
In addition to that you can use the connection to hide your activities from public networks, such as open WiFi, when accessing websites and you may bypass geo-blocking in the sense that your are connecting to web servers with your home IP address.
Never expose any service, but the VPN server, running in your private home network to the internet! To open ports to externally to get access to your smart home devices is a high security risk. Always use your own VPN and do not trust commercial VPN providers.
To get started, we need a home server installed and running. We use a Raspberry Pi, running on Linux Ubuntu. All details about what's needed and how to install are captured in our article Home Server Raspberry Pi 4 with Ubuntu Server Operating System.
PiVPN
Important information: This article is about the PiVPN, a nice pre-defined script for easy install of WireGuard VPN on a Raspberry Pi and other systems with similar Linux versions. Beginning of April 2024 it was announced that PiVPN is no longer maintained. Find more information here: Release v4.6.0: The end · pivpn/pivpn · GitHub!
We will review options and alternatives and we keep you updated on our website www.airix.net!
PiVPN is a project to simplify the VPN installation of Wireguard or OpenVPN on a Raspberry Pi. In principle it is just a collection of shell-scripts to make the installation and configuration much easier. The PiVPN projects runs its own officicial Website (PIVPN: Simplest way to setup a VPN) and a GitHub page that also includes the source code https://github.com/pivpn/pivpn.
This article covers the installation and use of the Wireguard VPN server (https://www.wireguard.com/).
Prerequisites
We use the home server installation as described in our article Home Server Raspberry Pi 4 with Ubuntu Server Operating System. But the installation should also work with Raspberry OS / Raspbian, Debian, and potentially others.
As described in our article, you should run your home server with an internal static IP address.
And you will need to have your router forwarding UDP port 51820 or whatever custom port you choose during the installation with PiVPN.
As you probably do not have an external static IP address with your internet provider, you may need to use a dynamic DNS address. For more details about dynamic DNS refer to our article Dynamic IP addresses and how you can connect to your home from outside.
Install Wireguard VPN Server with VPN
Start the PiVPN script
To start the installation, connect to your home server's command line via SSH and enter:
curl -L https://install.pivpn.io | bash
Note: The PiVPN installation scripts come up with a sequence of multiple windows during the installation. We have covered here only the most important parts.
Although we have our server running on Ubuntu, the script comes up with the message:

Confirm with Yes to proceed.
Select the user to hold the configuration
You can pick the user you want to hold the configuration files. We pick user ubuntu.

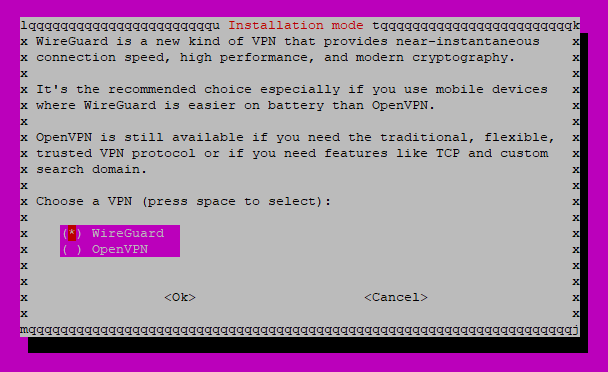
Select installation of Wireguard
PiVPN supports the installation of Wiregurd or OpenVPN. We go with Wireguard:
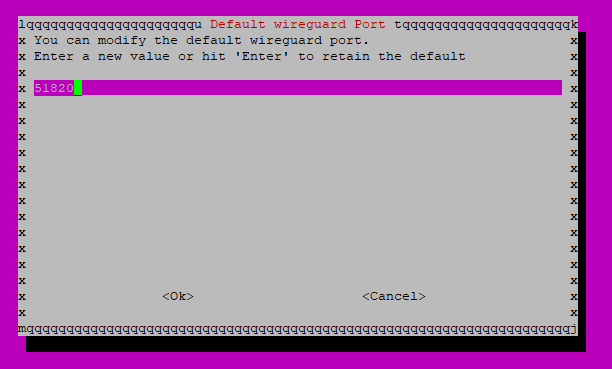
Choose the port Wireguard uses
We use Wireguard's default port 51820. Later, we will need to open this port in our internet router.
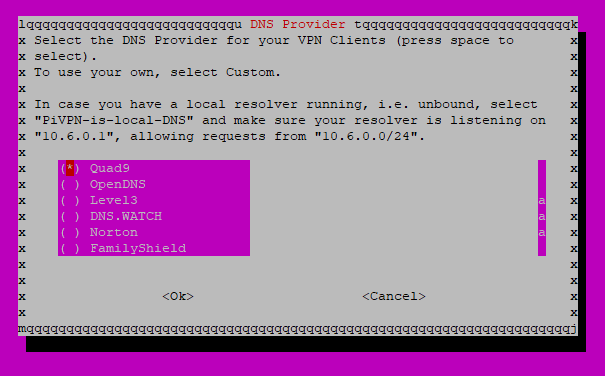
Select the DNS provider for your VPN clients
Here you choose your preferred DNS provider your VPN clients will use. You can select from the list or define the one you would like to use manually. We go for Quad9.
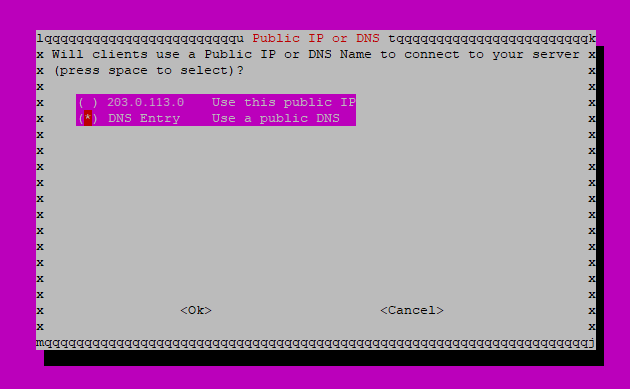
Connect via static IP address or DNS
Now you need to select if the clients use a public IP address of the VPN server or use a public DNS entry. Selecting public IP does only make sense when you are having an external static IP address with your internet provider. For home internet connections you probably do not have an external static IP address, but a dynamic external IP address that may change at any point in time. Hence, you will probably want to connect by using a dynamic DNS. For more details about refer to our article Dynamic IP addresses and how you can connect to your home from outside.
In case you do not have an external static IP address, select DNS Entry.
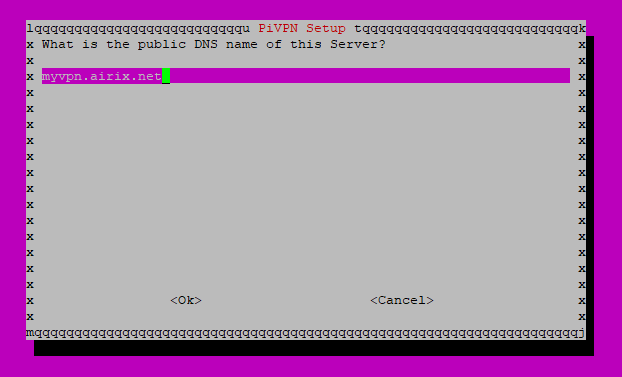
Enter the public DNS name of your VPN server
When you selected DNS Entry on the previous name, you enter now the DNS name you are going to use. In many cases this might be a dynamic DNS from your dynamic DNS provider (Dynamic IP addresses and how you can connect to your home from outside).
Generating Server Keys
In this step, the Wireguard server keys are generated. Nothing to enter here, just confirm, and it may take a couple of minutes until the server key generation is completed.

Setup for unattended updates of your VPN server
Once the VPN server is installed, it has a connection to the internet with at least one port open. That means that anyone from outside can try to get access to your server via this open port. Therefore it is recommended to enable the unattended-upgrade option. Once activated, the feature will check daily for security package updates and apply them when necessary.

Installation Complete
Now the installation of Wireguard based on PiVPN is complete. A system reboot is recommended.
To enable access from outside to your new VPN server you need to configure port forwarding in your router for UDP port 51820 (whatever custom port you choose during the installation with PiVPN).
Now you can create the client profiles for all your clients you want to allow access from outside.
Further Reading:
Home Server Raspberry Pi 4 with Ubuntu Server Operating System
Dynamic IP addresses and how you can connect to your home from outside